Two days a month I go to a WONDERFUL group called MOPS (Mothers of Preschoolers) http://www.mops.org/. After being involved for a year I am the Creative Activities Coordinator for this year. I thought you would enjoy taking a peek at our projects.
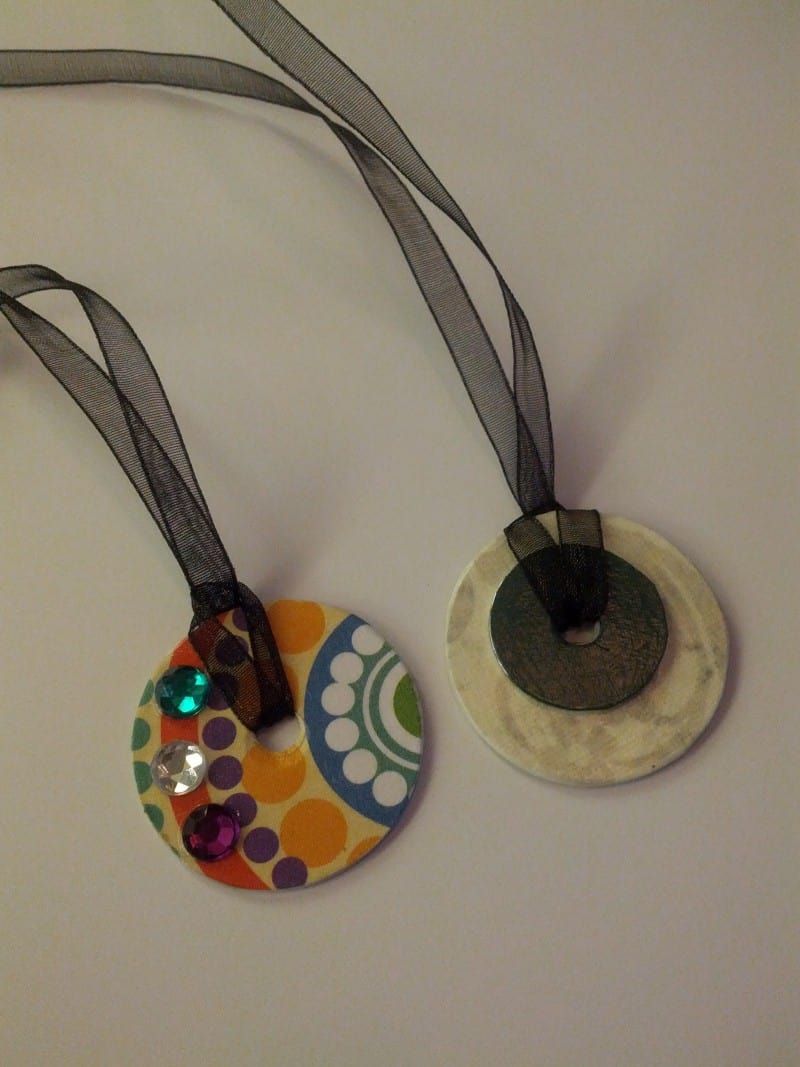
This week we are making Washer Necklaces. These are the ones I made for an example:
The first week at MOPS I asked all of the ladies what they consider their “craftiness level”. Level one being “lousy at them and find them frustrating” and Level 10 being “I am a Crafty Queen and the master of all crafts I came in contact with”. Most ladies answered between 6 and 9 and I would rate myself at a 7. I had one lady rate herself in the negative. I had to chuckle at the sweet honesty of that answer.
Because of the range of skills and confidence present, it is my goal have each of these at every meeting
1) a power point slide with picture examples of the day’s craft
2) written directions
3) most components of the craft at each group table (as opposed to a “community” table of supplies). This will enable everyone to interact, help each other and see what others are doing.
I was all excited about taking photos of the ladies crafting and then forgot to take a single shot! I am quite bummed about that because they came up with some fabulous creations.
The directions for these Washer Necklaces are relatively easy.
Washer Necklaces
Directions:
1) Choose some scrapbooking paper of your choice and some thin ribbon.
2) Trace washer(s) on scrapbook paper (inside AND outside circles)
NOTE: If you trace on the front make sure to carefully trim off your trace marks when you cut your piece out.
3) Cut out circle and hole punch center circle
4) Using paint brush, brush an even layer of Mod Podge on your washer and put your cut circle on top.
5) Brush even thin layer of Mod Podge on top of paper. Brushing from inside to the outside to eliminate air pockets under the paper.
6) Set aside to dry (about 15 min. to tacky 25 min. to dry to touch)
7) At this point you can trim up the edges if you desire.
8) Decide what bling you want and attach with Tacky Glue.
9) After all or mostly dry add the ribbon to your washer
10) Tie ends or add necklace clasp.
The most frequently asked questions were:
Q: Can I Mod Podge a design on both sides?
A: Of course, IF you have the time to wait for each side to dry. Don’t rush the process. Because we have a limited time in our group we only covered one side.
Q: Do I have to use paper?
A: No, If you just want to take your washer and cover it with bling go for it! We had a few ladies do this and they looked Great!
Have fun Crafting! If you make a creation I would LOVE to see it.
I made this necklace for my daughter. A great way for her to enjoy her glitzy self in an easy and inexpensive way.
Crafting with a group: For the interested…
What I Prepped to make this fun, quick and easy for our group of ladies—
1) I cut several sheets of different style scrapbooking paper about 3” x 6”. I prepped the paper for several reasons. First, I did not want circles out of many random pages and then having a bunch of scraps that weren’t useful . Second, Too many choices can slow an activity down.
2) I precut the ribbons into 30” pieces. I wanted them long enough to give the ladies the choice of how long they wanted it to be BUT if you let them cut their own many will cut them too short because they won’t take into account length needed to tie the washers on
3) Wax paper pieces for them to craft on so tables or covers don’t become a mess. Make it large enough for brushes to be put down and plenty of project room.
4) Mod Podge in Baby jars. I put two at each table.
5) Place all needed supplies in shoe box totes. One per table. I had two “community tables” that had paper and ribbon choices. All other supplies were in the totes. Again, my goal is for the ladies to have as much connection time as possible and that isn’t accomplished as well if they have to run around the room for supplies.
6) Samples and my craft completed. I want a physical sample for them to see and this frees me up to go around and answer questions.
7) Directions (several copies in each tote.
8) We split this into two times. They had 15 minutes to do the first steps and then ten minutes to wrap it up after our speaker time.
9) Prayer. I want this project to be a blessing to every Mom present. It may seem strange to have this on the list but I believe that God cares about the details. There have been times that after a simple prayer I think of something that will make things go smoother.
What are your tips for making group crafting in a limited time quick yet fun and easy? Would LOVE to hear your ideas!
– The Frabjus Lady



Leave a Comment