Clothespin Halves Trivet Craft Tutorial
I have always been a fan of crafting with wood. When I was growing up, my father would always be completing model ship kits and I guess you could say that’s where my love for crafting began. He preferred wooden ship kits and I think that’s why I’m always drawn to using this material. On this occasion, I have decided to use wooden pegs to create my sculpture. I have really enjoyed making crafts with our Clothes pins. Not only did I have to make the craft to create the tutorial but now I have two gorgeous trivets to display on my table.
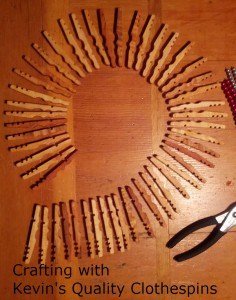
This smaller one is my favorite:
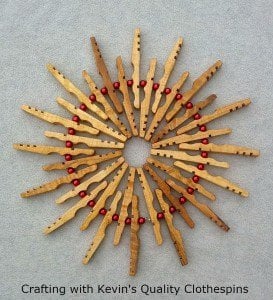
Already I have had several people mention how wonderful they look. No one can resist touching them when I show them that they change shape.
I love their simple beauty and diversity….

Because you don’t connect the ends together they can be moved into any shape you want. It is perfect for any size of pan, pot or platter

How to make a Clothespin Trivet:
Supplies:
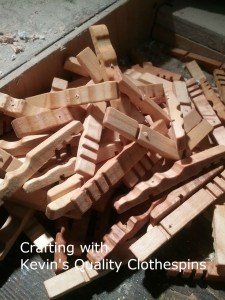
50 Kevin’s Quality Clothespins (If wanting to apply your own finish choose “plain” Clothespins)
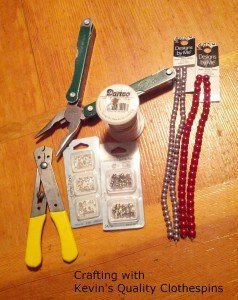
30 ” of Wire (I used 25 gauge wire. If you add more beads measure more wire)
50 Metal Beads, no larger than 3/8″ in diameter
2 Crimp Beads
2 Crimp Bead covers
Supplies for desired finish.
1) Apply desired finish to your clothespin halves. I put a light amount of boiled linseed oil on my pin halves and let them dry for 48 hours (too much oil in a spot will create a sticky residue). However, if you want a simpler, less messy, and similar finish you can spray them with a clear top coat (found where you buy spray paint). I like a clear finish because it makes the grain in the wood pop and highlights each pins unique beauty.
Lightly and evenly spray one side, Let it them dry thoroughly, flip, spray the other side and let completely dry.
2) Drill a small hole into each pin at the center of the middle arch of the clothespins halves. Drill the hole just big enough for the wire to pass through.

I created a simple jig out of scrap wood and clamped it to the drill press platform. Each time I placed the pin tight in the corner of the jig and then drilled the hole, it would pass through at the same location and go through the hole in the drill press platform.
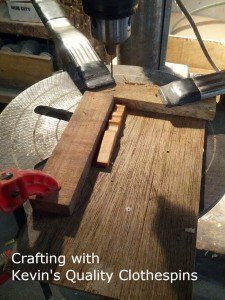
You can freehand this same process by using a hand drill on a sacrificial surface (a surface you don’t mind getting holes in).
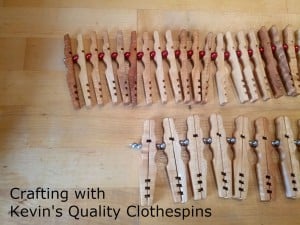
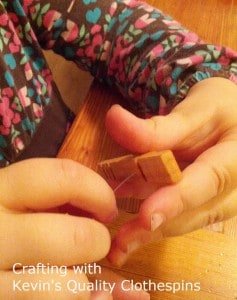
3) Gather your supplies, lay out the clothespin halves in the design you want and decide where you want beads.
Lay out your design
Here are a couple design examples:
NOTE: Trivet will vary in length according to how many beads and halves you use. My single half design was 3″ longer than the double design.
4) Bend the end of the wire and add a crimp bead, clamping it flat to hold the wire.
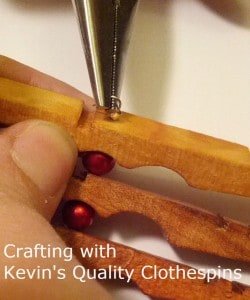

5) If desired add a crimp bead cover (works the same as a crimp bead, just makes it look like a regular bead is there not a squished one)
6) String the beads and clothespin halves onto the wire in the pattern you desire.

The littlest helped me string the clothespins
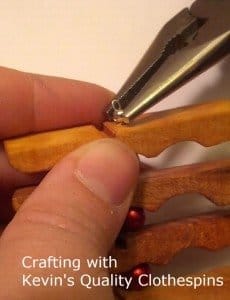
7) Add a crimp bead to the end to keep the items on the wire. Cut the wire to allow about an inch of excess. Bend the wire and tuck into crimp bead to create a loop. Flatten crimp bead with pliers to secure wires.
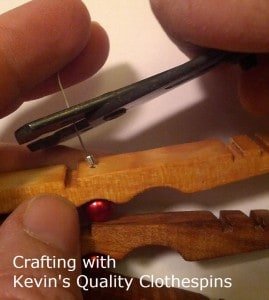
8) Add another crimp bead cover, if desired.

Enjoy your creation.
Note: A trivet is to hold hot items that are cooling to protect the surface of a table or counter. Do not place on a heating item such as a stove top or wood stove. It is still wood and will burn.
Here are the two larger ones I created with diameter measurements for when they are in a circle formation: (Each half is 3 1/2 inches in length). You can of course easily make these larger or smaller by adjusting the number of pins and beads you use.

Want to make your own? Your design is only limited by your imagination.
Click here to learn more about Kevin’s Quality Clothespins
Come Check out our other Crafting tutorials:
![IMG_20140919_193023[1]](https://ladyandthecarpenter.com/wp-content/uploads/2014/09/img_20140919_1930231-226x300.jpg)

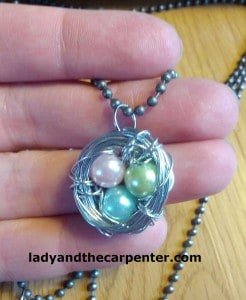
Bird Nest Necklace and Earrings
Teacher Appreciation Ornaments

Pouring wax
Happy Crafting,
The Frabjus Lady
This craft has been part of some fun linky parties here:
Jess | Make and Do Crew
December 15, 2015 10:20 pmHey! Thanks so much for commenting on the Buzzfeed post. Feel free to share it with your followers. The more traction it gets, the better for all of us.
http://www.buzzfeed.com/makeanddocrew/21-gifts-to-diy-with-stuff-you-already-have-lying-212bi#.idydoAq7m
Happy crafting!
Jess
Jess | Make and Do Crew
December 14, 2015 5:04 amI just included your clothespin trivet tutorial in a Buzzfeed list I currated called “16 Gifts You Can DIY From Stuff You Already Have Lying Around.” Just wanted to say thanks for the great DIY idea!
Jess
Hilary Jones
December 14, 2015 5:17 amThanks for featuring us! What a fun article. I left you a comment on the bottom of the article cause the link to the tutorial wasn’t working.
LOVE the book art. Just don’t think I would have enough patience (and probably time) to make one. The marker bouquet would be a super cute teacher gift.
Kelly
February 17, 2015 12:40 amSo creative!! I’ve been saying lately that I need to get trivets instead of using a cloth or something. 🙂
Thanks for stopping by the Wednesday Homestead Blog Hop.
Lou Lou Girls
January 5, 2015 2:49 amSo cool! Pinned and tweeted. We appreciate you taking the time to stop by our party. We love partying with you! I hope to see you on Monday at 7 pm. Happy Sunday! Lou Lou Girls