As many of you know I began to embroider this last winter. My goal was to create pieces that I could frame. I enjoyed my beginning pillow cases but I am not really into fancy towels or pillow cases.
I really wanted my focus to be artwork that I could hang on the wall. I didn’t want my embroidery to be limited to preprinted patterns. So, that meant I needed an easy method to transfer a pattern from a piece of paper onto a piece of fabric.
I am pretty crafty but freehand drawing is not a strong talent for me, especially if I have only one shot and no eraser option.
I searched and searched to find a tutorial and couldn’t find one. Most sites used transfer paper, but this paper would not work on linen. Most sites simply told you to transfer the pattern….okay…how do I do that? It was a bit frustrating. I then had an AHHA Moment! A light table!
That was great revelation but I didn’t have a light table and there was no way I was going to go buy one. So…. I made my own.
How to transfer an embroidery pattern to fabric using a homemade light table:
1) Get a box or tote with a level opening. This could be a shoebox or a random (relaitvely small) box from a store or your garage. I use the box I store my embroidery in.
Then place a piece of glass on the top. It needs to of course be big enough to sit past the edges of your box and big enough for your pattern. (I had a round table top glass sitting around I could use).
2) Next tape your pattern onto the glass to prevent it from moving during tracing.
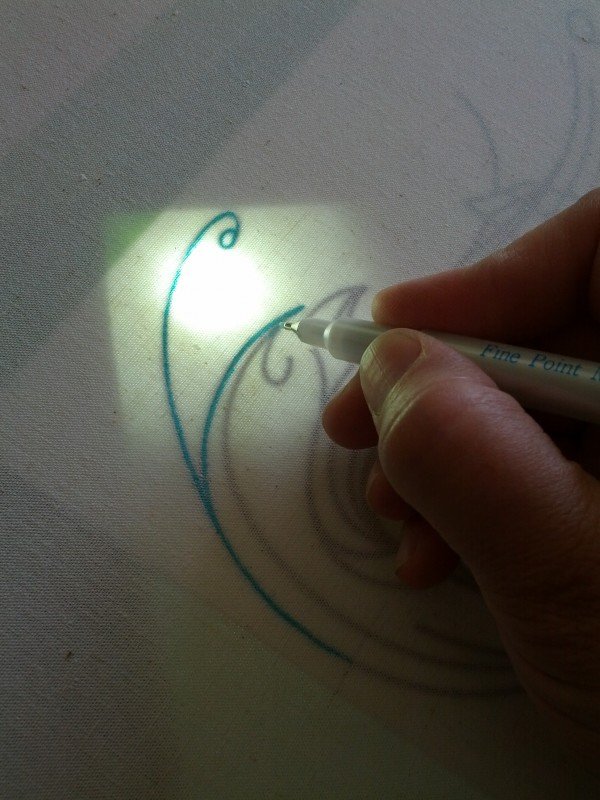
3)Put a flashlight in the box, with the light shining up through the paper. ( I like to use the flashlight app on my phone because it is very bright)
4) Now secure your prepared (washed, air dried, and ironed) piece of fabric onto the board. Make sure you line up the direction of your fabric with your pattern (this is why I set up the light first).
Make sure your fabric is secured with no wrinkles over the pattern. Don’t be shy with the tape. I used painters tape because when I am done I fold it over the edge to help my fabric not to frazzle at the edges during embroidery.
5) Using a water soluble fabric marker that works on your fabric choice, trace the pattern. Start from one corner working your way across your pattern. This helps you not miss a section.
As you work move your glass or flashlight to the area you are working on tracing. Because your fabric and pattern are secured your movements wont mess up your tracing.
6) When you think you are done and BEFORE you remove the tape from your fabric or pattern, turn off the light and check each part of your tracing for completion
That’s it! I have used this method several times. Pictured is my latest project. This is the first project I am completing for me. I am excited to see it come together and eventually be displayed on the wall.
Would LOVE to know what you are stitching or tracing. Enter a comment below.
Want to read my other embroidery related posts? Click one of the titles below:
Come Check out our other Crafting Tutorials:
How to build a Clothespin
Teacher Appreciation Ornaments
Bird Nest Necklaces and Earrings
Happy Stitching,
The Frabjus Lady











Jacqueline
September 23, 2014 8:57 pmBrillant using the phone as a backlight. Ill try this when marking quilts for quilting!
Beth @WiccanMakeSomeToo
September 6, 2014 12:14 pmWickedly genius of you. Love it!